Taking pictures at the bird feeder is difficult. If you stand where you can fill the frame with the subject, birds will not visit the feeder. Therefore, a standoff distance must be maintained to accommodate the tender sensibilities of most avian guests. Often times that distance is a bit more than can be overcome by the zoom features of the average point-and-shoot cameras and even the modern digital phone cameras.
Search, Selection, and Delivery
I searched the web for a device that: a) would not break the bank; and b) would facilitate a reasonable image suitable for a small-ish frame (maybe 8×10 inches at the most).

This is the lens package. Of course being an online selection, the only thing one has to go on is the product description and perhaps some reviews from the most trusted citizens around the globe. Which means “you pays your nickel and you takes your chances.”

Ordered online from “the big A” and it came in a an appropriately marked “prime” padded envelope. Looks good so far.

In spite of the damage seen on the light cardboard box, the contents arrived in tact and functional.
After paying just over $30 for this rig, I was becoming skeptical. A casual inspection of the equipment had me leaning toward “Hmm. Nice toy.” But I was pleasantly surprised.
Used with the naked eye, it is not impressive. Used with the included camera hanger and your iPhone or Android device in the camera mode, it becomes a useful tool. Let’s take a look.
Set Up

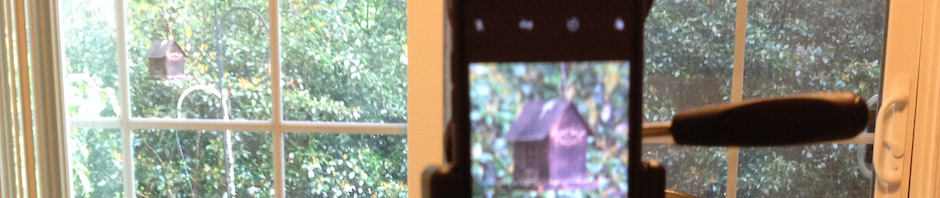
Seen here is the iPhone in the cradle/holder which attaches to the rear of the Britude telephoto lens. The telephoto lens is attached to a small tripod which sits on a tabletop. The lens is pointed toward a window which looks out to the backyard where a birdfeeder hangs from a large hook about 6 feet off the ground.
The details of attaching the iPhone to the cradle and then cradle to telephoto lens are very easy. Nothing remotely difficult about this. The directions are more or less “informative” by way of inference from the translation effort and graphics but certainly not needed by anyone of average mechanical ability.
The cradle will accommodate an iPhone 6s and any similar sized Android device. I will continue to refer to my iPhone because that is what I have but the same considerations apply to similar sized devices regardless of where the camera lens is situated on the device being cradled. The aiming and alignment will be slightly different but conceptually, everything still applies. It will become obvious in the doing.
However, the initial framing and aiming alignment bears some consideration. Observe:

Initial alignment of the iPhone lens to the telephoto lens produces significant vignetting. This is NORMAL for short-barreled telephoto lenses with relatively small apertures.
Easy fix on your fancy iPhone — use the iPhone “zoom” feature to frame your subject of interest. (See photo below.)

Zoom in on your subject using your device’s zoom feature until the vignetting is gone. The picture is still free from digital blotchiness. From here, you simply do your photographer work of “fiddle-framing” around and get your shot.
The telephoto lens comes equiped with a standard screw mount which fits on most tripods. This is a must as a human cannot hold the assembled equipment steady to capture a clear image.

Any touching of the iPhone or any other part of the assemblage while attempting to release the shutter WILL cause camera movement. A remote shutter release is absolutely a device you must add to your outfit.
These are available for less than $20 all over the web. (Amazon, eBay, Ritz Photo.)
Taking the Shot

Give thought to how you will capture your subject. The cradle for the iPhone will allow either configuration of landscape or portrait. Square is a select-able feature on the iPhone camera menu.
Here are a few “first shots” from my dinning room table to the birdfeeder which is about 25 to 30 feet away through the window.
The photo here is the very first shot taken through the telephoto lens. It’s “okay.” However, if studied carefully, one will notice the finch shows signs of my “flinch.” To release the shutter (or “capture” the image), the photographer must physically touch the device. As mentioned earlier, this will cause movement of the equipment and sharpness will be lost. The remote shutter release is a must have for this setup.

The next photo was snapped with the remote shutter release and I believe the clarity is superior. Well, at least there is no blur from touching the equipment. Others may argue that the lens lacks brilliance and I’ll yield to that. But remember what we’re dealing with here. This isn’t a Pentax lens or even a mid-level Vivatar.

I took a few videos just to see how the remote shutter would work with the video feature on the iPhone. As one might have guessed, it is a “click” for ON and then a “click” for OFF. A simple toggle function.
Conclusion
Using this “camera outfit” was both different and similar to my experiences with “real” cameras. By real cameras I mean the kind which once held cellulose film requiring sooo many more considerations than these whiz-bang algorithm driven digital imaging handheld computers. And “real” lenses with multiple elements contained in the tube yielding both fixed (telephoto/telescopic) focal lengths and variable (zoom) focal lengths which cost waaaay more money than the little jewel seen here.
Aside from the obvious cost gap, the differences are size, weight, and configuration of the lens and camera interface. The ergonomics are simply not natural. (Not bad. Just different. It works.)
The similarities are in the thought processes of taking a photo. Picking the subject, steadying the platform, framing the shot, and finally “pressing the shutter” (accomplished mechanically or electronically) to capture the image. And, just like the old days, there may be some “processing” involved. Color correction will not be accomplished with chemicals in a darkroom but rather on a computer screen using a specially designed digital algorithm.
Knowing the outfit’s limitations and staying away from those boundaries will allow the hobbyist to get pictures not quite as good as the high end equipment but decidedly better than any attempt without the capabilities of this little monocular/telephoto/telescope.
I am pleased to report that this is a fine little tool for the amateur at a profound savings and is completely functional for the hobbyist.